


Backing up your iPhone, iPad, or iPod touch will ensure that you have a copy of your information in case your device is ever replaced, lost, or damaged.
-
Set up a wi-fi network on your device.
-
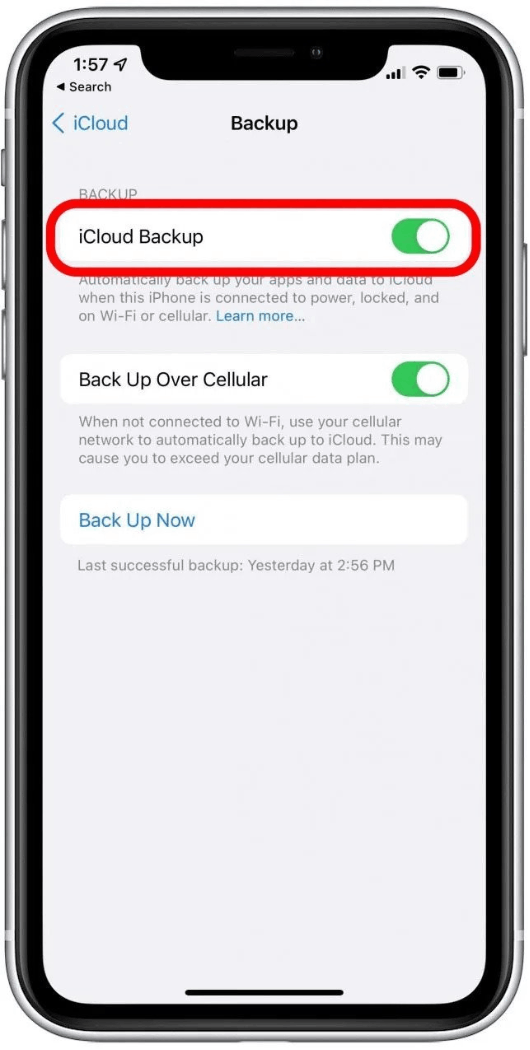
From the Settings menu, select iCloud.
-
Select the iCloud Backup option.
-
Tap Back Up Now:
Stay connected to your Wi-Fi network during the process. The last backup timne and date will be shown under Back Up Now.
You can buy more iCloud storage space if you get an alert that there is not enough space to complete the backup.
-
Turn on iCloud Backup in Settings > [your name] > iCloud > iCloud Backup.
-
Plug your device into a power source.
-
Connect your device to internet via Wi-Fi.
-
Ensure that your device's screen is locked.
-
Follow the onscreen steps to buy more storage
if you get an alert saying you don't have enough
iCloud storage space to complete the backup.
Back up with the Finder

- Open a Finder widow on a Mac running macOS Catalina or later.
- Use a USB cable to connect your device to your computer
- If you are asked for your device passcode or to trust this computer, follow the onscreen instructions
- Choose your device on your computer
- You must encrypt your backup in order to save Health and Activity data from your Apple Watch or device.
Check the "Encrypt local backup" checkbox and create a memorable password. - Click Back Up Now.
- You can check if the backup was successful when the process is complete. You will see the data and time of the last backup.
A Finder window showing an iPhone backup in progress. A Finder window with the data and time of the last
backup magnified about the Manage Backups button.
Back up with iTunes
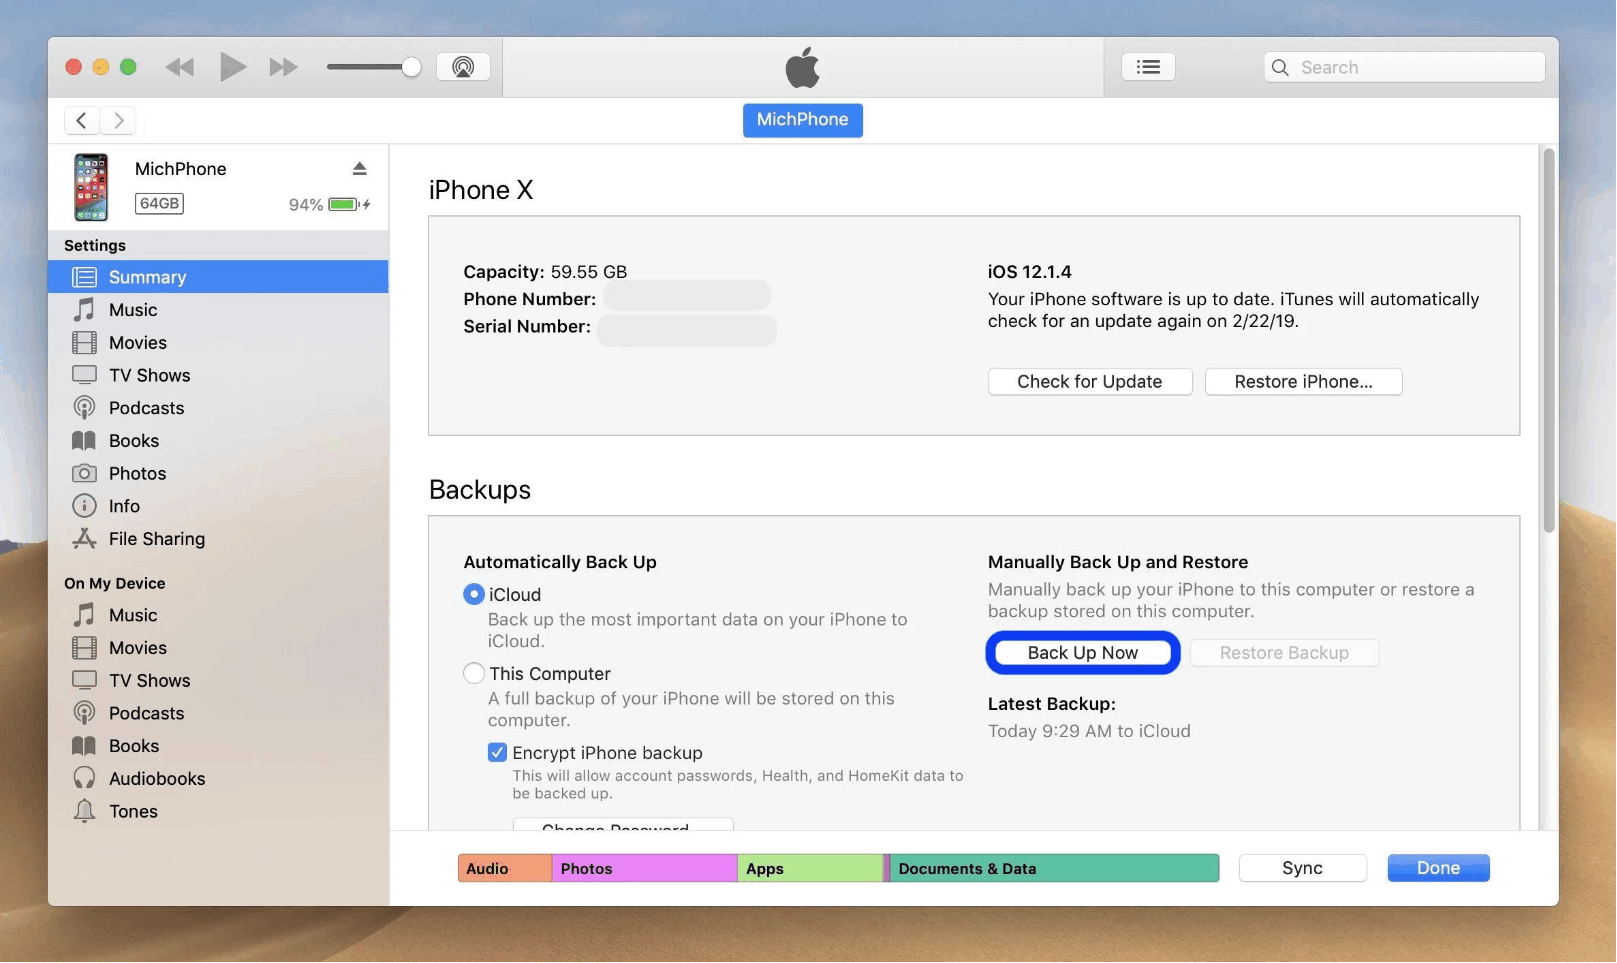
- Open iTunes on a Mac running macOS Mojave or earlier.
- connect your device to your computer using a USB cable
- Follow the onscreen instructions if you are asked to enter your device passcode
- Choose your device on your computer
- Your backup must be encrypted if you wish to save Health and Activity data from your device or Apple Watch.
Enable the "Encrypt [device] backup" checkbox and create memorable password. - Click Back Up Now
- You can check if the backup was successful when the process is complete. You will see the date and time of last backup.

- Open iTunes on your Windows PC.
- Connected your device to your computer with a USB
- If you are asked for your device passcode or to Trust This computer, follow the onscreen steps.
- Select your device in iTunes
- Click Summary
- if you want to save Health and Activity data from your device or Apple Watch, you need to encrypt your
Backup. Select the "Encrypt local backup" checkbox and create a memorable password. - Click Back Up Now.
- When the process ends, you can see if the backup finished successfully. You'll see the data and time of the last backup.
Backing up your iPhone, iPad, or iPod touch will ensure that you have a copy of your information in case
your device is ever replaced, lost, or damaged.

Learn how to create a backup of the files on your Mac
Backup your personal data with Time Machine, the built-in backup feature of your Mac. This includes apps, music, photos, emails and documents. Backups allow you to recover deleted or inaccesible files.
- Connected an external storage device, such as a USB or Thunderbolt drive.
- Open Time Machine preferences from the Timne Machine menu in the menu bar. Or choose
Apple menu > System Preferences, then click Time Machine. - Click Select Backup Disk
- Choose the name of your disk, then click Use Disk. Automatically, Time Machine will begin making periodic backups
without further action on your part.
In the same menu, you can check the status of a backup or skip a backup in progress. If a backup is underway, the menu shows how much has been completed. When no backup is underway, the menu displays the date and time of the last backup.
Using Time Machine, you can automatically make daily backups for the past month, weekly backups for all previous months, and hourly backups for the past 24 hours. When the backup disk is full, the oldest backups are deleted. While the first backup might take a long time, you can continue using your Mac while it is being made. Backups made with Time Machine will be faster since it backs up only the files that have changed since the last backup.
Click Options, then add (+) an item to be excluded from your backup by opening Time Machine preferences. Click the remove (-) button to stop excluding an item, such as an external hard drive.
In Time MA shine, you can choose Browse Other Backup Disks from the menu if you back up to multiple disks by holding the Option key.
Your iCloud Drive files and folders are always up to date across all your devices, and you can access them from your iPhone, iPad, iPod touch, Mac, or PC, and on iCloud.com.
- Update your Mac to theLatest MacOS
- Set Up iCloud on all of your devices.
- Make sure that you'reSigned in to iCloud With Same Apple ID on all of your devices.
- If you have a Windows PC, update to Windows 7 or later and download iCloud for windows.
- Set up iCloud Drive everywhere that you want to access and edit your files.
- Go to Apple > System Preferences, then clickApple ID. If you're using macOS Mojave or earlier, you don't need to click Apple ID.
- Select iCloud
- Sign in with your Apple ID, if you need to.
- Select iCloud Drive
- You can add files from your Mac Desktop and your Documents folder to iCloud Drive by turning on desktop and documents
- In the iCloud section of the Finder sidebar , you will find your Desktop and Documents folders.
- In iCloud Drive, you can find the files in your Desktop and Documents folders on the second Mac, in a folder with the same name as the second Mac. There will be no automatic merging of your second Mac's files with your first Mac's.
- Any documents you have already stored in iCloud are automatically moved to iCloud Drive after you set up iCloud Drive. In addition to Pages, Numbers, and Keynote, your iPhone, iPad, and iPod touch keep your files in the files app. If you don't see your files in these apps, they might be on a device that doesn't have iCloud Drive enabled.